Into The Nightmare Rift
From Lexicanum
Giants of Wrath
After getting the treasure of Ardathanatus, they returned to Magnimar to spend it, over the course of the next few weeks. Eventually, they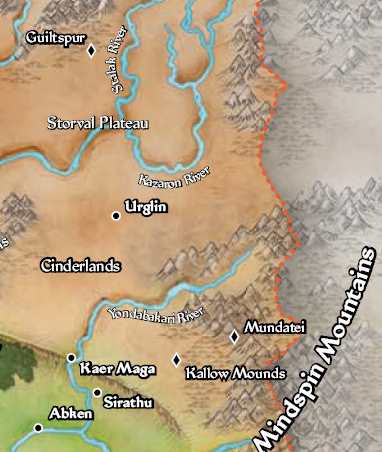 concentrated on the shard, getting a vision of a large green spire.
They quickly identified the spire as the Guiltspur deep in the Storval Plateau.
concentrated on the shard, getting a vision of a large green spire.
They quickly identified the spire as the Guiltspur deep in the Storval Plateau. With this limited information, they set off for the closest point they had been, Kaer Maga. Once there, they set about finding a guide courtesy of the Augurs and also used the library to get the lowdown on the Guiltspur. They found out the it was a pinnacle of stone, set above the ruins of a Thassilonian laboratory, an embassy for strange and otherworldly allies of Karzoug, the Runelord of greed.
Guided by a young troll, they set out on the three week walk to Guiltspur, across lands infested with purple worms, Rift Drakes, Stone Golems and worse. After several encounters, they are a little over halfway.
Arrival at Guiltspur
After several more days travel and encounters with Giants and Gugs, they reached their destination, the fabled Guiltspur. A huge tower of green stone loomed up into the desert sky, and around it, a stockade with giants moving around in it. As they watched, seeing a patrol of a Fire Giant and several Hill Giants make their way out, they became aware of a stage-whispered conversation to one side of them. Investigating, they found two Hill Giants that had escaped them last night and set about resolving that.One of the giants fell where he was, while the other made a break for the stockade, until felled by a Cone of Cold. As night fell, they saw some giants come forth to investigate, looking very confused.
Sonic Attack
Th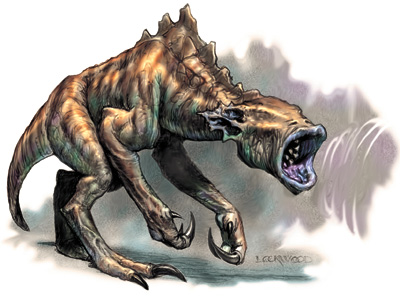 ey decided to catch the patrol in an ambush – this worked out well for
them and they dealt with the patrol with the minimum of fuss.
ey decided to catch the patrol in an ambush – this worked out well for
them and they dealt with the patrol with the minimum of fuss. A second patrol was dealt with as well, with a little more effort. They settled for the night pleased with themselves and went to sleep mounting guards.
During the night they were awoken by waves of pain although they were unable to see anything.
As the pain became excruciating, especially for Arkwright, they finally saw the source – Destrachans. Once they could see what was doing it, they could deal with it, although Arkwright was kept alive only through the services of virtually every other party member healing him at some point.
They moved camp and the rest of the night passed peacefully.
The Deal
They decided to take the battle to the giants and attack the building in the compound. They moved under cover of darkness to the cliffs above it and flew/feather fell/air walked down and began to move silently into the lee of the building – unfortunately, as Gilfarin approached the front corner of the building, Magda demonstrated why you should never rely on a sneaking dwarf. A giant who came to investigate was despatched but the damage was done and a huge battle with the giants commenced, including fore giants and hill giants and, most effective of all, burning Mastodons.After the battle they treated their wounds and cautiously opened the door into the fort. Inside, two giants with resigned looks on their faces waited for them and called something out. As they prepared to rush the giants, a commanding fire giant appeared and called on them to hold, as she wished to parley. In return for leaving them alone and getting rid of their leader, Chief Jubbek, she would leave the area, together with leaving them whatever magic items were here.. They agreed.
The Deal Dealt
They decided to rest on it and returned to Sandpoint. The next day, suitably refreshed, they returned to find the giants ready to move as soon as Jubbek was dealt with. They headed down the stairs and into a chamber with three Fire Giants in it, one of whom managed to run before Magda did her thing. A couple of side tunnels contained miners, Hill Giants who were not a great threat. A third tunnel lead to a chamber containing a menhir, covered with worn runes which they failed to decipher. Moving on, they entered a long, wide hallway with several doors off it. Investigating them, they found on the left numerous long passageways, leading off beyond their sight. To the right was a vast cavern, with some sleeping giants on a ledge on the far side.As they pondered their next move, they came under attack from throw rocks. Magda charged and nearly fell into several pit traps before finally reaching her target, the Hill Giants through an arch at the far end of the hallway. With magic and might, they dealt with these and decided the double doors at the end of the hallway were more interesting than the side passages. Opening them they found Jubbeks throne room and a complicated fight with the leader of the giants. As Magda took care of the waves of giants coming at them, with the help of Tristan and Gilfarin, Arkwright attacked the giants leader and killed his pet – this enraged the barbarian, who charged into the middle of the party and attacked the magic user – this proved a bad move for Jubbek, who soon succumbed to the tender attentions of the party.
The Monster Pit
They decided to investigate the side passages off the main hall before heading deeper into Jubbeks chambers. The found a number off aggressive giant prisoners in pits, with their hands cut off and also a pit full of trolls. The last pit had a lone hill giant in it, who they decided to rescue as he told them he was there because he had helped some Shoanti escape from Jubbek. He told them that beyond Jubbek's chambers, guarded by two fire giants, was the door to the ‘monster pit’, as well as telling them that their leader, a blue dragon called Cadrilkasta, had disappeared into it. They decided to deal with the fire giants and then tell General Stom she could go.The fire giants did not prove much of a problem and true to her word, General Stom left with the rest of the giants, leaving a heap of stuff behind.They collected the stuff and sold it, splitting the gold between them, before leaving Togbad (the hill giant they had rescued) in charge of the fort. Opening the door to the ‘monster pit’, they found a pit with a fog covering it. Arkwright identified a private sanctum, blocking all detection spells, as well as several other effects.
Guiltspur Depths
They did much analysis of the foggy depths and slept on it, coming to the conclusion that divination and teleport type magic were blocked within. Then, with no further ado and little warning, Tristan jumped into the depths, leaving the party a little confused. Gilfarin started to climb down, then remembered her ring of feather fall while Arkwright flew. Magda meanwhile set off in her stoic dwarven way, climbing and muttering to herself.Meanwhile, below, Tristan seemed to wake from a dream, in which he saw a library with all staring at him, followed by the destruction of the
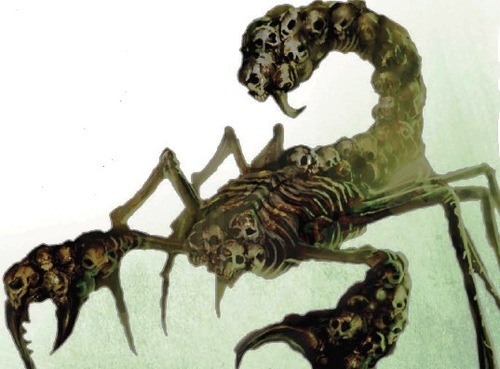 library. Then he realised he had found the floor painfully and, looking around, saw a large scorpion like construct – he sensibly air walked
out of the way just in time for Gilfarin to appear as she gently wafted
to the floor. As Gilfarin came under attack from the construct and
Arkwright arrived, another of the beasts joined the fray. As fireballs, chain lightning, flame strike
and all manner of magic filled the air, Magda arrived just in time to
get grappled. With Gilfarin and Magda in serious trouble, Tristan saved
the dwarves life by casting freedom of movement, allowing her to escape the grapple and help combat the beasts, which fell soon after.
library. Then he realised he had found the floor painfully and, looking around, saw a large scorpion like construct – he sensibly air walked
out of the way just in time for Gilfarin to appear as she gently wafted
to the floor. As Gilfarin came under attack from the construct and
Arkwright arrived, another of the beasts joined the fray. As fireballs, chain lightning, flame strike
and all manner of magic filled the air, Magda arrived just in time to
get grappled. With Gilfarin and Magda in serious trouble, Tristan saved
the dwarves life by casting freedom of movement, allowing her to escape the grapple and help combat the beasts, which fell soon after.While the combat had been going on, Gilfarin thought she caught sight of an elderly man out of the corner of her eye but, with time to look around, there was nothing there. They searched the room and moved on.
The next room contained six statues of angels, who troubled Tristan but he was uncertain as to why. The statues spoke a greeting, welcoming the adventurers to the Hall of Arcane Wonder and requesting them to treat the exhibits with respect. The party moved through the next few halls displaying great reverence, finding a damaged sphinx (where Tristan had another of his waking dreams, this time remembering only that he had stood in front of the Crawling Chaos whatever that was), a partial juggernaut of vaguely serpentine aspect and a fireball hanging in mid air. The final exhibit was a tower,climbing into the distance above.
The Silent Halls
They moved on through a large hall containing huge specimen jars – the four jars contained an Aurumvorax, a partially dissected large spider, a Roper and a young Silver Dragon. Leaving the exhibits for now, they moved through the western doors, after Gilfarin had disabled the trap on them. here they found a huge chamber, with a fountain directly in front of them and stretching away to the left. As Tristan lead them in, two Elder Water Elementals materialised in front of him and attacked. Tristan moved away from them into the room as the rest engaged in combat. Things looked very dicey for awhile, but Arkwright and Gilfarin used their magic to deal with the elementals, while Tristan had another nightmare, feeling himself dragged under water before coming to his senses.The next room contained an altar to an unknown god, where Tristan had another nightmare, being lifted high above a strange frozen mountain plateau by two faceless creatures, before falling towards it and coming to. Meanwhile, Gilfarin saw the strange old man again but, as before, he wasn’t there when she turned to look at him.
The next room contained an old skeleton with several magic items. As Gilfarin and Magda moved to investigate, the old man who Gilfarin had seen so many times suddenly cast Prismatic Spray at them. There commenced a titanic battle of magic which ended with him passing the doors to the specimen chamber and them closing, leaving the party standing for a few rounds expecting him to reappear. When he didn’t, Gilfarin opened the doors.
Exhibits Amok
Opening the doors, GIlfarin heard crash and saw the dragon had been released from its tank and was gradually clearing its head. Of more immediate concern, she saw the ghost as the battle continue unabated. as Tristan went to gather the bones and equipment of the dead man from the ante-chamber, the rest of them engaged their enemy, avoiding the dragon who was looking around in confusion. As they entered the room, he reversed gravity which was a minor hindrance, and smashed all of the remaining stasis vessels, releasing a Roper and an Aurumvorax. As these fell, the ghost withdrew, the sight of its remains being dumped in a fountain being too much for it. Investigating the backpack found on the body, they discovered some spell books.The Lake Below
They searched for the ghost to finally put it down and fund it in the room with the fireball suspended in the centre. As it was running low on spells, it took little effort to finally kill it and they returned to the place where they had found his body. Moving through the doors, they found a room with strange doors painted on the wall – a little investigation took them into a Magnificent Mansion, although a little skewed with unusual food. After resting, they passed through a room with an idyllic scene on one wall – as they watched it turned to a nightmare vision of dust and ashes and a huge creature turned to look at them – then the vision faded and the idyll returned.Beyond the double doors that were an exit from this room was a truly massive hall, lined with columns. As they walked down it, two of the columns came to life and attacked, in the form of faceless angels. Gilfarin and Magda found themselves sorely pressed before Magda finally overcame the Caryatid Columns, thanks to her Scarab of Golem Bane.
At the end of the hall, a huge lake stretched before them and Tristan cast Wind Walk to enable them to investigate it. Following a row of columns that once supported a bridge, they made their way to an island, where they discovered a deep shaft hidden by illusion magic. As they stood there, Gilfarin saw a massive shape pass in the water, a vaguely tentacled and strangely frightening sight. Exploring the lake further, they found a second island covered with strange formations of rock, forming patterns. Further round they found a beach with stalagmites upon it, with the central stalagmites broken and crushed as though something huge has passed this way. Passing the beach they found a pit, with swarms of purple worm larva and beyond that, a vast, seemingly bottomless, pit. Flying across the pit, they could see a tower beyond.
The Mother of Oblivion
They spent some time wondering what to do next,eventually deciding to investigate the drop below the illusions in the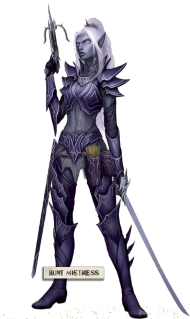 central ruined tower. They
found a huge cathedral structure, which they started to investigate. As
they did so, they came under attack from a flying worm, which buffeted
them with a mighty gust of wind and then turned invisible. As one, they
ran away back to the previous cavern.
central ruined tower. They
found a huge cathedral structure, which they started to investigate. As
they did so, they came under attack from a flying worm, which buffeted
them with a mighty gust of wind and then turned invisible. As one, they
ran away back to the previous cavern.They next had a look at the instant fortress, which appeared to be full of Drow. One came out to talk to them and suggested they hunt the shard together. They refused and made their way back to the main cavern feeling confused and directionless – they needed some mindless violence and at their next stop they found some.
On the island on which the stones had been arranged in strange patterns, they came under attack by Nagas, which they were beating easily when Tristan was taken by the huge monster Gilfarin had half seen earlier. As Gilfarin and Magda dived into the water withy some idea to save him, Arkwright killed the beast instantly with Destruction (or something like it) and they made their way to shore (although Magda had to be told Tristan had been saved).
The Pit of Silver Mists
As Tristan was saved, a Drow landed on the island to offer to unite their forces once again in return for some quality time with the shard – they refused and she left. They went back to the mansion and then wind walked down to the level below. Passing through the double doors lead to a titanic battle against the Flying Polyp, which they eventually defeated.They passed through the doors to the north into a large chamber containing a pit of silver mist. Arkwright did some investigation and worked out that this pit was a link between worlds, but was unsure of where it lead. They decided to have a look at the rooms leading off the chamber, each of which had a placard above it.
The Dreaming Crypt: This room contained sarcophagi, opened and emptied and an unusually bright Ghoul, who begged for mercy. Against Tristan's better judgement, they granted it and he explained he wanted to get home to Leng, to be reunited with his brothers. He joined the party and helpfully chatted to whoever, kept to the back.
Guiltspur Grand Hall: This room had a green curtain part way into it which was strangely damp to the touch and two faces carved into the wall which radiated a strong magical field of conjuration. Tristan swept back the curtain and saw a skull begin to rise into the air, at which point he shouted demilich and run, which they did.
Guiltspur Treasury: A plain room with nothing in it save the bones of a scorpion like creature.
Binding Chamber: This contained statues of a woman, one larger than the others which held braziers. As they watched, two heads became apparent above a grill in the centre of the room, one of an Astral Deva and one of a Nalfeshnee, both pleading to be freed and for the others death. Tristan and Magda decided that putting out the braziers would kill or free them and, more by luck than judgement, freed the demon, which turned out to have the soul of an angel and offered such aid as it could in its demonic body.
Whisperstone Sanctum: This contained nothing except a strange stone floating in the air, which they determined to be a store of ancient lore, requiring a key to activate.
The Abysium Core: This room contained a large blue-green crystal which sent lightning flashing round the room.
The Demilich
After a bit more searching around, they came to the inescapable conclusion that they were going to have to fight the Demilich. They buffed Magda and prepared themselves (generally by the magic users saying “I can’t do anything”).In the event the most useful spell they had was silence, which kept them relatively safe until the angelic demon used its grapple to really nerf the combat. With the Demilich gone, they collected a rod and a crystal key from its seat and headed for the Whisperstone.
Temple of the Crawling Chaos
After the Demilich, the Whisperstone proved something of an anti-climax, telling them the secret of the ritual to activate and safely pass the portal. Duly anointed, they dropped into the silver mist and, after a bit of a gut-wrenching journey, they found themselves halfway up a mist-shrouded peak in front of a great temple.After seeing off some Nightgaunts that took offence at their being there, they made their way inside, where they encountered some of Morcrufts old friends and killed them – again. During the battle, Morcruft disappeared.
The Bone Pit and Beyond
They moved on up the corridor to a double door at the end. After Gilfarin did her usual, they opened it to reveal a Ghoul charnel house, complete with ghouls, which promptly attacked. With Magda's armour class the Ghouls proved little threat and were soon dealt with. The room beyond had three exits, To the right were several sarcophagi, one of which contained the body of Izzy, much to their surprise.To the left was a chamber three feet deep in gnawed bone, which contained a couple of Gugs, one of whom knew a little magic, not that it did them much good. They also found a crystal, which gave them a view of a large bowl with something slithering inside it and a number of Moonbeasts seeming to feed it, at which point the vision cut.
The last door lead into a huge hall, where they were set upon by a Moonbeast
Opening the door, Magda made her way forward – only to be attacked by a Moonbeast, in possibly the worse judged ambush ever. The party moved into the main chamber and, the other Moonbeast dealt with, Gilfarin moved to the large bowl at the far end. A tentacle flopped out of the bowl and promptly swallowed her whole, leading to the sad demise of our hero.
Realising they had little chance against the Shoggoth, the rest of the party retreated to plan. They decided too cast Freedom of Movement on everyone, as well as Protection from Energy (Electricity) and lead the Shoggoth to the dragon.
In the middle of the planning session, they were interrupted by Lerel, a sorceror who had lost her party by accident (Teleport being an unreliable method of travel) and wanted to join theirs.
Finally, the plan went into effect and a titanic battle ensued, the Shoggoth being dealt with by the dragon, just before it ran.
They retrieved the shards that Izzy had been carrying and used them to find out where they needed to go, In the mountains to the North. Fully prepared for what was to come, they defeated the dragon (not without some personal risk) and retrieved it's hoard, including the shard of Sloth.
They returned to the pathfinder guild, in some renown, where Sheila told them of the plan to reforge the Sihedron.