Curse of the Lady's Light
The Lady's Light
They gave up on the most annoying Derro they had ever met and returned to the Pathfinder lodge to report. Sheila supplied the Ioun stone to neutralise the curse and her husband turned out to have a scholarly interest in the murals and statues they had seen so Nathanial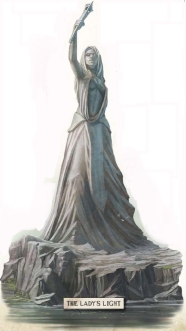 spent several days cataloguing them for him before
they were reminded of their quest. Magda concentrated on the new shard
and got a location – the Lady’s Light, a huge statue to the south on
the coast. They headed there by ship and landed a few miles up the
coast, as the reefs around the headland were too dangerous to navigate.
spent several days cataloguing them for him before
they were reminded of their quest. Magda concentrated on the new shard
and got a location – the Lady’s Light, a huge statue to the south on
the coast. They headed there by ship and landed a few miles up the
coast, as the reefs around the headland were too dangerous to navigate.They set off for the statue along the coast, soon reaching a bridge decorated by Troglodyte and Boggard skulls leading to an island. As they made their way across, a bad tempered old woman told them to go away, so they did.
They passed a cave leading into a hillside and soon reached a Boggard village. Cautiously, they made their way round it and passed another cave before reaching the statue. Once there, they could find no way in and so, after some discussion, decided to backtrack to the cave they had passed. This turned out to be inhabited by some Boggards, lead by a rather violent Boggard with some pet frogs.
The battle was short but bloody, before they prevailed and began to take stock of their surroundings.
The Caves Beneath
They picked up the Boggards shiny things and moved deeper into the cave system, eventually reaching a large chamber with three other exits. In the centre of the chamber stood a seven sided basalt monument, with the same rune carved on each side. The top of the monument was missing and small albino insects scuttled everywhere. As they moved into the chamber they came under assault from much larger albino insects – Albino Cave Solifugids. Once the Solifugids had been defeated, they determined that the rune was that of lust and enchantment and that it had once had a Succubus bound inside.Growing bored with this (apart from Nathanial, who was planning to set up a study group), they picked a passage at random and headed down it. It lead to a room with walls of worked blue-veined white marble, with columns around the wall in the form of warrior women. As they entered the room, four of the columns came to life and attacked them. The fight proved extremely challenging, especially for Nathanial, who found himself isolated, and Ismeina, who was just very unlucky.
Tristan, on the other hand, enjoyed himself, riding his luck to grapple the columns and throw them down a strange pit in the centre of the room. Once the columns were defeated, they started to investigate the pit in the rooms centre.
The pit was dark and eerie, so Nathanial took a look with Detect Magic, finding three auras – Evocation, Transmutation and Illusion. As he investigated under the guard of Magda, Tristan wandered off to check out the other passages, accompanied by Ismeina. They found a fungus filled cavern, with a crude barrier at the far end. As they moved to check it out, they were attacked by Violet Fungi, which forced them to retreat, with Ismeina hideously wounded by their rotting touch.
The Lady’s Cape
They spent a little time healing the wounded and tending Ismeina’s wounds, before deciding to finish off the Purple Fungi (definitely not fun guys) and see who had built the wicker fence. Withe the knowledge of what lay in the room, they first used fire balls and scorching rays to soften up the enemy before charging in, clearing the fungi out with relative ease. Beyond the fence, a long passage lead to a great cavern.As they cautiously began to explore, Magda found herself confronted by a huge alligator and engaged it. As, with the aid of the others, she felled the beast, a darkness sprang up behind them and Troglodytes charged out of the gloom to attack. The battle lasted some time, as almost an entire tribe came at them, including its leader, a cleric who preferred fighting to spells and soon learned why that was a bad idea when confronted by a dwarven fighter. As the battle came to its inevitable conclusion, Nathanial started to explore a side passage, calling down it. From the far end came a call of surrender, which was not quite what he had expected. Emboldened, he moved in to formally accept the surrender and, having quizzed the four cowering Troglodytes he found, released them. By this means, he learned of the large pit trap to the north in their lairs centre, as well as of the fever room, where they treated their ill.
After searching around and finding the Troglodytes pitiful treasure hoard, they set off back to the central chamber with the broken column and set off to explore the final tunnel. This lead to a great cave where a huge beast with many serpents heads glowered down the tunnel at them. After a few seconds, it lurched forwards and unleashed a fire ball from its mouths. Magda retreated back down the tunnel, followed n short order by Ismeina, with the others eventually deciding that this was probably the best idea, as the circumstances of the terrain would make combat with such a monster difficult at best.
Death of an Archivist
They decided to get healthy and go after the Hydra. The next day, with Izzy recovered fully thanks to a nights rest and restorative magic, they cautiously approached the Hydra cave. With some effort, they located the Hydra and engaged it, finding the battle somewhat easier than they had expected but still heavy going. Once the Hydra was defeated and they had recovered the shiny things from the mouth of its cave, they went back to contemplating the strange hole in the floor of the columned room.
Eventually, they grew bored of looking at it and Damon took the plunge, literally, followed by the others. They sank slo
 wly
through darkness to find themselves in a large U-shaped room, with a
sepulchre in its bend. Of more immediate concern were the two Caryatid
Columns waiting for them, which were defeated with the loss of several
non-magical weapons and, sadly, the Clockwork Servant. Magda was
particularly upset, having formed a bond of kinship with the strange
being. They investigated the sepulchre, finding a very well preserved
woman within, who had an uncanny resemblance to Sorshen. Ignoring the
resemblance, they took the jewels decorating the corpse, shaking off
the feeling of fear as though they were being stalked that almost
overcame Damon as he touched the body.
wly
through darkness to find themselves in a large U-shaped room, with a
sepulchre in its bend. Of more immediate concern were the two Caryatid
Columns waiting for them, which were defeated with the loss of several
non-magical weapons and, sadly, the Clockwork Servant. Magda was
particularly upset, having formed a bond of kinship with the strange
being. They investigated the sepulchre, finding a very well preserved
woman within, who had an uncanny resemblance to Sorshen. Ignoring the
resemblance, they took the jewels decorating the corpse, shaking off
the feeling of fear as though they were being stalked that almost
overcame Damon as he touched the body.Moving on, the corridor came to an end at a red door covered with carved panels. Pressing the central panel caused the door to open, as well as displaying the phrase ‘Ayandamahla is bound to the Light for all ages’ in ancient Thassilonian. Beyond was a sandy cove with two boats moored in the river, each capable of transporting three people. Magda decided to wade as the others clambered into the other boat and headed down stream. They soon reached a lake with a seven sided stone platform at its centre supporting a large statue, seemingly made of glass. Drawing alongside the island, Nathanial stepped from the boat confidently, only to discover he status was a Glass Golem, which moved swiftly to attack. The assault was brutal, short and lethal, leaving Nathanial dead on the island and the others retreating to another sandy beach to the east, where they found a door in the caves wall and stopped, shocked by their friends demise.
Evocation & Exploration
They investigated the beach, finding two burials marked by shields, to which they added that of Nathanial. The shields on the other graves were those of the Gray Maidens, former guardians of the queen, who disbanded on her death, leaving just a few dedicated to the overthrow of the current Korvosan ruler. They rested in a large room through the door in the cave wall, mildly disturbed by the lascivious nature of the wall art.During the night, Magda heard a choked-off shout, followed by a loud splash in the lake.
Investigating, she found someone dripping wet walking up the beach. After challenges and introductions had been conducted, they settled by the fire to exchange pleasantries, much to Tristan's annoyance since he was trying to sleep. The newcomer turned out to be an Evoker, just what they needed after the loss of Nathanial, and he joined them.
The next morning, they moved on, finding a door with a sliding panel in it. As they approached, a gruff voice challenged them, asking for the password. Ismeina immediately said ‘Speak friend and enter’ but unfortunately, this was not Durin's door to Moria and their challenger apologised for having to kill them, before closing the panel. Ismeina picked the lock and they moved in, to be confronted by a Dhampir. A lengthy combat ensued as he had cast displacement, among other spells, but eventually, after Tristan disarmed him, he was cut down. Tristan used speak with dead to learn that he had been compelled to attack them by his mistress.
They moved on into a hall, with pillars of beautiful women lining its centre, the nearest one missing its head. As they moved in, the reason for this became clear, as they were attacked by Marble Sentinels. The pesky little blighters were soon overcome, although not without causing problems for the party.
Demons
After resting they continued down the corridor, lead by Tristan, who discovered a deep spiked pit by falling into it. After some messing about, they got him out and Ismeina made the trap safe. On the walls near the pit was another mural, this time of a crowd of adoring spectators focused on a beautiful woman with several men and women chained between pillars behind her.The next room contained two columns carved in the woman's likeness, as well as an Incubus. They came under attack from two Schirs, which held them up in the corridor and caused considerable damage. Once the Schirs had been dealt with, they nervously closed on the Incubus, who proved to be a total wimp and teleported away as they attacked him.
They moved on into a huge room with a strange grey flame at its centre. As they moved into the room, four Cacodaemons attacked (one each, which was nice). The fight went on for some time before the first of the Cacodaemons fell, easing the pressure on the party and allowing them to quickly finish off the others.
Dreams and Desires
After more resting and researching in the room of the grey flame, they headed through the door to the east, into a corridor of doors. The first on the right was covered with a sheen of ice, so they investigated all of the others first, finding several small sleeping quarters. After Ismeina had disarmed the trap on the icy door, they discovered it to be false and went to a mural at the far end of the corridor, which turned out to be an unsubtle secret door. Through it they found a rather less than tasteful tarts boudoir, for want of a better description.Moving on, they came into an octagonal room with a complex starburst mosaic on the floor and a door to the north. After Arkwright informed them that the starburst was some form of suggestion magic, they avoided it and headed north into a square room with three other exits and a pool in the middle. Arkwright informed them that a powerful dispel magic was in effect on he pool, so they avoided that as well.
To the west, they found an alchemists lab and Arkwright spent a happy half hour pottering around collecting potions and salves, while carefully avoiding the less stable ones. Unfortunately, during his investigations, he accidentally released two Grey Oozes, which caused Magda some consternation as they damaged her weapons, leading to the use of the well known Dwarven weapon, the chair leg.
After the battle, they went north, into a practice area for enchanters with a book on a stand, which Arkwright swiftly appropriated. The book was called Dreams and Desires and contained some pages, as yet unread.
To the east they found a room with an octagonal summoning circle in the floor and another book on a stand. This time, as Arkwright made his way round the circle to the book, he completed an ancient summoning ritual by accident and a Seugathi appeared in the room, causing him horrific injuries in just a couple of rounds and leaving him unconscious almost before the others moved. The monster proved too strong for our heroes and, managing to retrieve the wizard, they retreated to consider their options.
Mochtau's Hall
They retreated to the sleeping chamber and settled for the night after healing up a little. During first watch, they were woken be the sound of smashing timber, as the Seugathi searched for a way out of its new prison. Inexorably, the sounds moved towards them as they prepared for combat. This time, a little more prepared and organised, they managed to defeat the monster, although not without considerable injury.The next morning, they returned to the grey flame and decided to light the torch on the wall from it. Once lit and placed back in its sconce, the torch triggered the opening mechanism for the door, showing a long flight of stairs leading down, terminated by a painting of Sorshen, with an inscription telling them to prostrate themselves in order to enter her domain. One by one, they did so and were transported to a landing platform with boats tied up at it. With Arkwright flying, they set off across the huge underground lake. Part way across, a group of Lacedons attacked, attempting to capsize the boat but were easily driven off.
They landed at a jetty, with a red panelled metal door – pressing the central panel, they found a big columned room stretching away into the darkness. They moved forward, encountering a clumsy ambush by a pair of monitor lizards, before Tristan went ahead to investigate a challenge form up ahead, exhorting them to kneel before Sorshen. He found a Cave Giant lumbering towards him, which swiftly changed direction on seeing Magda. The fight was brief as the giants clumsy attacks repeatedly missed the dwarf as the others took the opportunity to batter to death. Once the giant was overcome, a search of the chamber showed it to be empty apart from rotting meat and some Tourmalines. They decided to rest.
The Manacled Prisoner
They decided to move the throne, finding a platinum plaque with a lengthy inscription on it. Then they set out to explore further down the cave, with Ismeina flying ahead. As she did so, she came under attack from Skavelings and wisely retreated to re-join the rest of the party in their boat. The combat was a little untidy, with Nathanial suffering badly and almost dying, but the bats were eventually killed. Unfortunately the delay meant that Ismeina had to climb round the walls the rest of the way, which ended with her falling into the lake. This attracted the attention of two giant Moray Eels which proved a difficult issue for the plucky rogue until the party arrived to aid her.
They landed on a beach with two tunnels leading off it. As they explored, Tristan found a patch of wall which seemed, for some reason, suspicious. He called across Ismeina who searched around and informed him he had found his first ever secret door. Despite this, they decided to check out the tunnels first and headed down the first one. This lead to a cavern with a rocky outcrop in the middle. On this there was a woman tied to a post, being tormented by a Sea Hag who welcomed them as though they had been sent for her to torture. As Magda and Ismeina set out to swim to the island, the hag killed the woman, before Nathanial hit her with a fireball. This rather took the wind out of the hag's sails and, after a very brief combat, she fled, leaving the party discussing their options.
A Clerical Calamity
They decided to explore the remaining flooded caves, with Magda setting off to swim across to where two bodies lay on the far side of one of them. As she neared halfway, she came under attack – the hag was back for a repeat performance. This time it did not go quite so well for her and, despite some initial success, the hag was finally defeated. The corpses turned out to be more Gray Maidens, again showing signs of torture. Growing bored with this, they moved to the secret door on the beach.The other side of the secret door turned out to be a cooking site, with fishing nets and poles drying on the walls. Through the double doors off the kitchen they finally found some living Gray Maidens, sitting at a large table gambling, and set about making them dead Gray Maidens with great enthusiasm. Despite repeated requests that they surrender, the Gray Maidens proved suicidally combative and there were no survivors. After the battle, the party heard sounds of metal on metal next door and waited for the next group of Maidens to attack. Again, this did not go well for the Maidens, with one of them falling in the sunken bath in the middle of the floor before they were vanquished.
The party found a secret door and headed down the corridor. At its end was a room full of perfume bottles, one of which turned out to be a trap – the party managed to mostly avoid its effects and gathered some perfume from the room. On the way back down the corridor, they found a secret door and opened it, finding a forbidding looking room decked out in black as some sort of shrine. As the others set off to retrieve bits and pieces and complete the search of the perfume store, Tristan strode into the shrine and was disturbed to see three large demonic dog like shapes form out of the swirling black fog at the rooms ceilings – Shadow Mastiffs. One bayed, causing Ismeina and Nathanial to run and the other two charged the cleric. Almost before he could react, they had torn him to pieces, with the others too far away to help. Magda rushed to the scene and held the door against the Mastiffs until Nathanial and Ismeina arrived to help and, after a very close call, the party managed to defeat them at a terrible cost – Tristan was dead.
Tristan Transformed
The remaining members of the party gathered on the beach for a short ceremony to bury Tristan, and settled to recover from the days endeavours. During the night, Ismeina, who was on watch, saw a boat being rowed through the phosphorescence of the lake towards the beach and woke the others. As the boat neared, they realised that is appeared to be Sorshen, moving slowly toward them. Some confusion followed, until the figure identified itself as a slightly discombobulated Tristan who had awoken in a new body – he was not particularly happy with the somewhat diaphanous dress he had woken in and the change of gender had left him a little confused. Even worse, he now had to dig up his corpse to reclaim his gear – all in all, not the best day this cleric had ever had.In the morning, they set off back in to the caves of the Gray Maidens, to complete their reconnaissance of the shrine. As they did so, Ismeina
 found some writing and Nathanial translated it – apparently, speaking
the name of the artist of the mural by the alter would transport the
speaker to the inner sanctum (whatever that might be). After quite some
time, Ismeina came up with the name and said it while no-one else was
listening. On doing so, she vanished, leaving the others in the shrine.
found some writing and Nathanial translated it – apparently, speaking
the name of the artist of the mural by the alter would transport the
speaker to the inner sanctum (whatever that might be). After quite some
time, Ismeina came up with the name and said it while no-one else was
listening. On doing so, she vanished, leaving the others in the shrine.She found herself in the eastern alcove of a large hall, with four humanoid but hideous creatures – Sinspawn. She moved away from the Sinspawn as the others appeared and found herself transported again – this time to a long narrow hall with double doors at either end and gold plates sunk in the floor. The others moved to join her and they briefly explored the area (finding a cesspool and some green slime but very little else) before returning to the shrine to teleport back and fight the Sinspawn – which proved relatively easy. They then decided to try walking from room to room as this was less confusing and went down a long passageway which opened into a huge pillared hall. As they moved in to the hall, they were soon beset by Lemures and Ismeina, Tristan and Magda became embroiled in a long battle with the devils. Meanwhile, Arkwright went looking for the summoner and eventually found another Sinspawn – once she had been located, it took some time for him and Tristan to take her down with magic as the others finished off the Lemures.
The Spinning Serpents
Nathanial scanned the large hall with Detect Secret Doors and found one,while the others played with the throne. Beyond it was a room with a strange magical aura, some form of abjuration magic. Ismeina checked it out and, after she had disarmed the alarm trap, they went in. The floor was covered with an unpleasant mosaic so they headed for the door in the opposite wall. Beyond was a large room with several exits and a large column in the centre supporting a spiral staircase. They could hear voices, discussing some form of battle strategy and they moved into check who and what was there.They discovered several Gray Maidens and battle was joined, with Magda charging one group and Ismeina the other – in the middle of all this, Tristan managed to charm one of the Maidens and sow enough confusion in her head that she almost believed him to be Sorshen. The other Gray Maidens did not surrender as they were joined by some comrades and a brutal fight lasting some time saw their eventual defeat. Tristan quizzed his new friend, gaining some useful information, before letting her go to return to the surface.
They moved on up the spiral stair case to a room with statues of all of the Runelords, which contained a puzzle. Eventually they worked it out and were teleported to another location in the Light, to separate rooms. They soon met up again, in a room with two serpent mosaics on the floor which could be rotated. As Nathanial worked this out, the others investigated the only remaining door in the room and discovered the leader of the Gray Maidens, Oriana. Seeing them, she attacked and was finally defeated by their combined might.
The FInal Battle
After a nights rest, Arkwright put his theories about the rotating snakes into motion and, after a couple of attempts, aligned their heads, causing a shimmering mist to bisect the room. They stepped through, appearing between two pillars in a room with an Incubus and an Alu-Demon. While Ismeina and Magda battled the Incubus, Arkwright and Tristan fought the Alu-Demon.After an interchange of magical attacks (mostly fireballs from both sides, with the occasional searing light), Tristan decided to arm wrestle the demon for victory. This did not go quite as well as could be hoped, but once the Incubus succumbed to its wounds, the Alu-Demon swiftly dimension doored away.
Once they had recovered their breath, they searched the room and found two teleports – one lead out of the area, to the large hall where the illusionary party had been and so they rested up before returning to see where the other went. It lead to a treasure room, containing the Alu-Demon. This time round, the combat went more smoothly and having dealt with the demon, they ransacked the chamber.